Archive for the ‘6mm’ Category

Mahdist Ansar

Posted: June 6, 2017 in 6mm, Baccus, Patrols in the Sudan

So after a month of waiting my flags arrived from Baccus and I was able to finish of my Mahdist Infantry bases. Quite pleased with the results, now I have to work through the pile of lead that I picked up at Salute!

Had to lighten the photo due to forgot flash, doh!

Mahdist Riflemen

Posted: April 11, 2017 in 6mm, Baccus, Patrols in the Sudan

Have finished 8 bases of riflemen  (2 per section) for my initial  Mahdist force. Have done them with their colourful patched Jibbeh 

Real life keeps getting in the way but next up 30 bases of sword and spear weilding Ansar……

Jolly Jack Tars

Posted: April 5, 2017 in 6mm, Baccus, Patrols in the Sudan

One of limitations of my Patrols in the Sudan project in 6mm is the range of sculpts available. Whilst Baccus have an excellent colonial range there are a few gaps, one if the most significant is the lack of a royal navy landing party. Heroics and ros do a 6mm landing party but the figures are small in comparison to baccus.

The solution is to convert and there are some wonderful paint conversions online from ACW skirmishers. So armed with a pack of confederate skirmishers from my other 6mm project a file and some greenstuff I began the conversion in earnest

Stage one I filed the soft wide brimmed hats to achieve a more straw boater effect

Stage two mix greenstuff aim for a bluish green mix approx 60:40 as I am going to roll this and don’t want it too tacky.

Stage 3 roll out thin sheets of greenstuff and leave to partially cure, about an hour should do. You don’t want it to tacky as it will be difficult to  cut and place.

Stage 4 Once partiality cured cut approx 2x2mm squares.

Stage 5 place on neckline of figure and using a wet blade cut and press into place. Voila neckerchieves done. Now just to paint them up…..

Stage 6 phone the men in white coats to take you away (optional).
They are as you can see far from perfect but once painted I think they will look okay.

Have finished the last 11 bases of British Infantry, this time in Khaki so I have now completed enough for sections for PITS so now onto my Dervishes, I am starting with 8 bases of riflemen and then onto the horde of spear and sword wielding Ansars. 

Finally finished my Royal Marines, I have 3 squads now completed so enough for a British Infantry force except for scouts. I have another 10 bases of regular infantry to finish, this time they will be in khaki rather than the serge and khaki mix of my first two regular infantry bases.

At the same time the postman has been busy delivering firstly some terrain templates from S&A Scenics, Patrols in Sudan requires 9 of these templates.

Secondly Postie delivered the beginning of my Mahdist forces with 96 riflemen and 96 spear and sword armed warriors. As with all Baccus figure the sculpts are fantastic at 6mm it’s truly remarkable the detail and character in the poses.

Until next time……..

PITS continued

Posted: March 29, 2017 in 6mm, Baccus, Patrols in the Sudan

Slow progress due to real life getting in the way have finished painting my next squad for PITS, just need to finish basing….

Royal Marines ready to face the fuzzies.

As April rapidly approaches thoughts turn to Salute and this year’s project, or rather this year’s pile of lead to add to the altar of unpainted shiny a testament to my inability to focus on one project and see it to the end.

Gordon’s Alive!!!!!!!

This year it shall be Peter Pigs Patrols in the Sudan. I have had this one on the back burner for over a year now, in fact it was going to be last year’s focus before I decided to go all in on hail caesar in 10mm. What put me off last year was the cost of the starter forces in 15mm, I like to have at least two opposing forces for any ruleset and that would be close to 80 quid and that’s without scenery on which the game relies. The range of plastics out there in 28mm from Perry makes scaling up a credible option however again the cost of scenery would be an issue.

Baccus to the rescue

So if 15mm and 28mm are not an option that leaves scaling down 10mm and 6mm. Pendraken do an excellent Sudanese range in 10mm however I decided to go to the premier manufacturer of mini minis, the undisputed 6mm champions Baccus. Whilst the range isn’t as extensive as Pendraken, Baccus offer a good selection of minis more than enough to cover the primary units. 

Small yet perfectly formed!

Peter Pigs starter force of 3 British units comprising of 8 bases each and 4 bases of scouts, for a total of 28 bases comes in at £34, one pack of 96 troops, enough to make 4 units and 3 extra bases from Baccus comes in at £6.60 + £2 for bases means that you can have a starter force for just over a quarter of the price!

Steady lad’s….. wait to you see the whites of their eyes!!!!

So far I have made up two units and have two to complete, I have ordered a couple of bags of Mahdists for the princely sum of £13.20 again just under a Quater of the price of a Peter Pig Mahdist starter box.

More to follow…….

Problem with buying new shiny is that you have to paint it! This years haul from Salute included 2 Baccus 6mm Union and Confederate army packs and a booster infantry pack for each so a hefty haul of lead that I now have the daunting task of having to paint!
As a Lee, hell my father is Robert Lee unfortunately R J not R E, my leaning has always been towards the Rebels. Having a romanticised view of the South standing up against those darn meddling yankees trying to enforce their fancy ways on those good ol Southern boys!
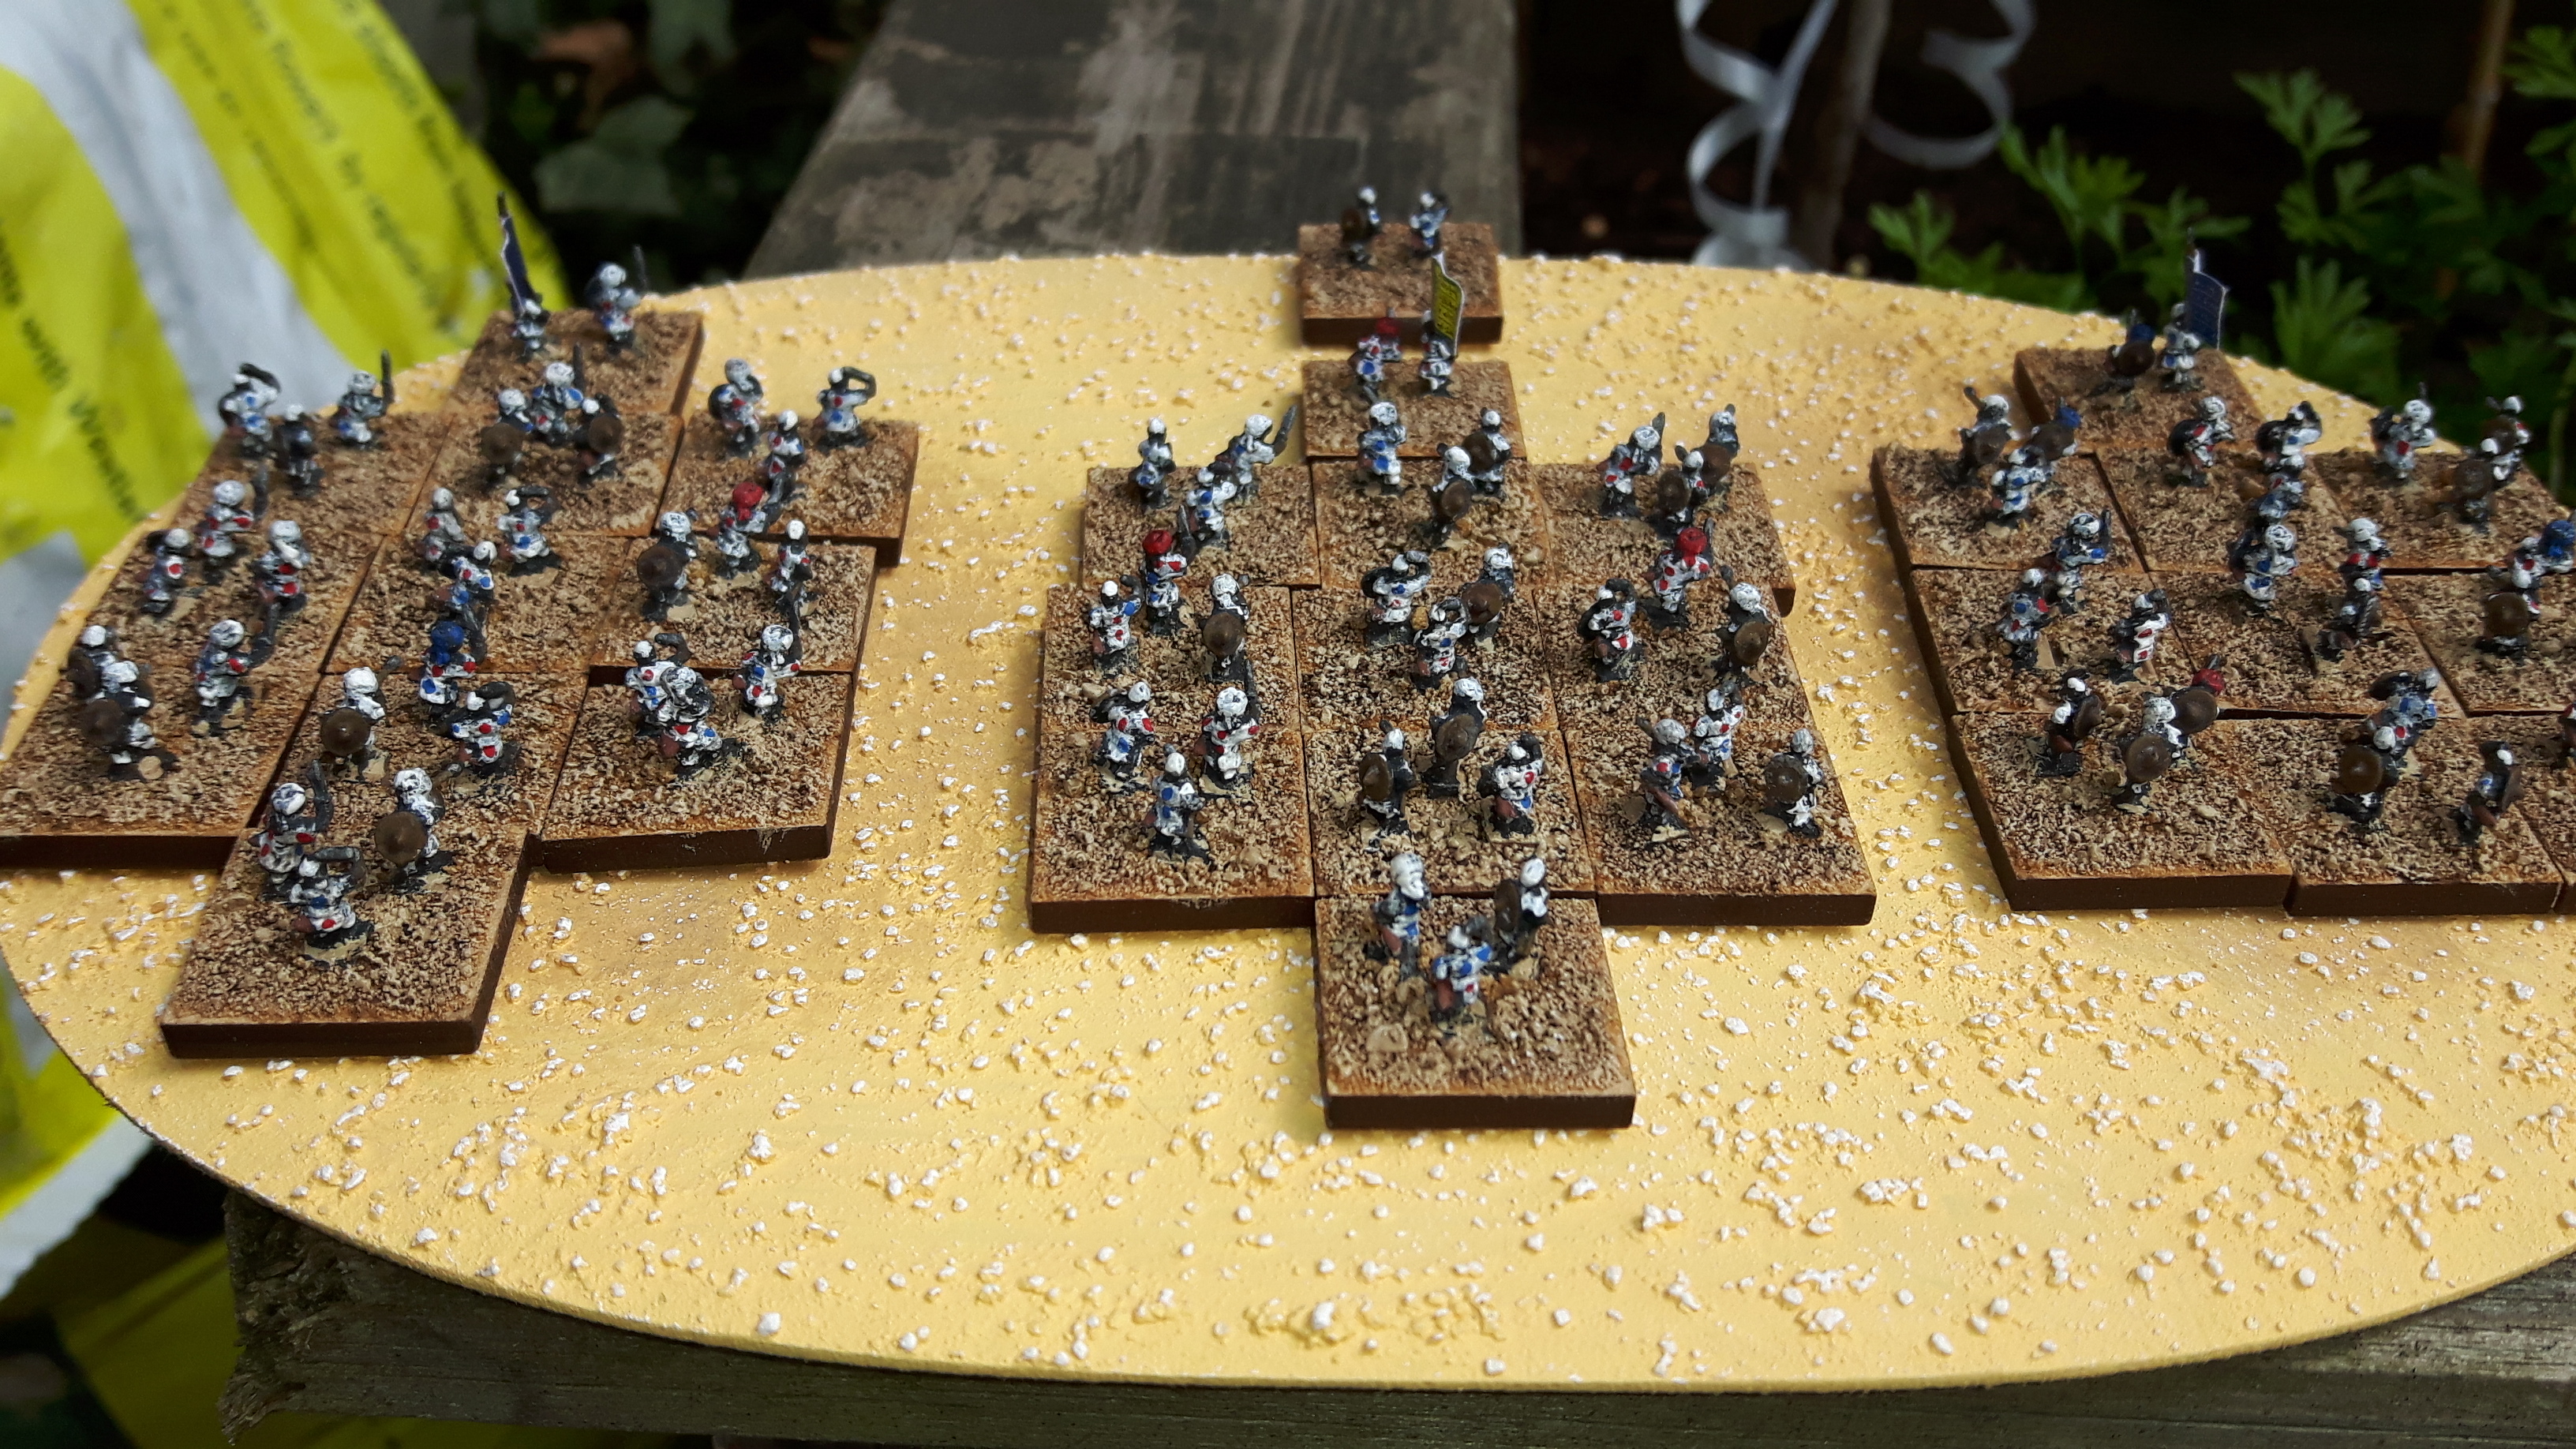
Stage1

image

Firstly I would just like to say to those who think at 6mm scale you sacrifice detail, definitely not, the sculpts from Baccus are jam packed full of detail, probably more than my limited painting skills can do justice, with a wide variety of poses. The Rebels have a good mix of kepis, slouch hats and bed rolls that should ensure that no two bases looks identical, a key factor when going for a ragged rebel look. Secondly the sculpts are clean and crisp so minimal prep needed. I am going for the production line method and I am mounting each strip of 4 figures on an ice lolly stick with identical strips of sculpts on the same stick so when painting I can ensure a non uniform paint job.

Stage 2

image

Undercoating is down to personal preference, my colour of choice is grey. I have used Tamyia fine grey surface primer in the past to good effect but recently I have favoured Vallejo USN Light Ghost Grey. I prefer light grey as I can easily make out the detail which I find with my ageing eyesight black primer masks. Also in this case with painting rebels the predominant colour will be grey so it makes sense.

Stage 3

image

Give them a generous wash of GW nuln oil. Instantly detail leaps out and a preshading has been done.

Stage 4

image

I start painting from bottom layer out so skin is GW Kislev Flesh.  Now the deuniforming of the ragged rebels begins. There are 3 dominant colours to Confederate uniforms, Grey for jackets, trousers, kepis, slouch hats and bedrolls, Butternut for slouch hats, jackets and trousers and finally light/sky blue for trousers and infantry kepi bands, collars and cuffs of jackets.
I start with trousers I leave 50% grey and have a 30/20% blue and butternut respectively. For blue I use Vallejo Sky blue with hint of Vallejo Prussian blue to darken. For butternut the home dyed cloth of the confederacy I went for either Vallejo german camo pale brown and Vallejo Khaki.
I then painted jackets again I kept most predominantly grey, to get a mixture id shades I dry brushed with Vallejo Sky Grey but also had about 20% butternut again using Vallejo German Camo Pale Brown and Vallejo Khaki.

Stage 5

image

Hats next, again I wanted a good variety of colours, so again a mixture of greys and browns. The dark brown is Vallejo German black Brown, the lighter browns include Vallejo German Camo Pale brown, Vallejo Khaki and Vallejo Flat Earth.
After hats it was onto crossbelts which I painted white as well as the food sack on their left hip. Canteens where painted with Vallejo Green Grey.
Rifles next these I painted predominantly with Vallejo Mahogany Brown apart from the barrel which was painted with GW Abandon Black and then drybrushed with Vallejo Gunmetal.

Stage 6

image

Time to get the GW Abandon Black out to paint boots, belts cartridge pouches and kepi peaks

Stage 7

image

The beards and hair where painted using Vallejo Flat Earth (everyone in my army has brown hair!). The base was then painted Vallejo Flat Earth.
Then the washes start. Any brown areas I washed with GW Agrax Earthshade. Flesh is washed with GW Kislev Flesh and any metal areas get a wash of GW Nuln Oil.
At this stage I now protect the paint by applying Vallejo Brush on Matt Varnish, I used to be a fan of spray on varnish but one frosting incident was enough to now make brush on my chosen technique. It may take longer but as they say spray in haste, repent at leisure.

Stage 8

image

image

Figures are now based for Altar of freedom in 60×20 mm bases. To ensure I get a non uniform mix of strips I blu tack to bases taking from each lollystick at a time and placing in a different position each time. The only uniformly placed, but not uniformly painted strip, is the command strip. Therefore each base has a Unique look.
Strips are then glued with loctite powerflex gel and then the base is coated in GW PVA glue, yes you can buy it cheaper and by the proverbial bucket load but I find GW glue actually sticks the prerequisite for a glue!

Stage 9

image

The ground is then painted with a mix of Vallejo Flat Earth, GW PVA glue and water. Once dried I wash with GW Agrax Earthshade and highlight with Vallejo German Camo Pale Brown.
Blobs of GW PVA are then painted on and flock is applied.

Stage 10

image

image

The final stage is to add flags and hey presto done.
The biggest lesson I learned was dont get hung up on the detail, these wont be winning any Golden Demons but are to a decent (In my opinion) tabletop standard at arms length. Secondly when production line painting keep the batch to a reasonable and not soul destroying number. My first batch consisted of 24 strips equating to 4 stands which was manageable the second batch 42 strips was too many and I had to really motivate myself at times to get it done Painting 168 faces or pouches can be mind numbing and tiring on the eyes at this scale.
Next up will be command stands and artillery…….

Another year passes and so that brings another Salute. Each year I like to go with a main project focus, otherwise I would throw money here, there and everywhere with my wargamming ADHD!
image
This years focus was 6mm ACW for Iron Ivans Altar of Freedom. For the last 2 Salute’s I had toyed with the idea of starting an ACW project but other periods have won the day. This year I did my research on rules, Fire & Fury (both varients), Johnny Reb 3, Longstreet and even Baccus own Polemos where considered.  In the end I plumped for Altar of Freedom from Iron Ivan games. What swayed it was the ability to replay the large set piece battles of the war, and at 6mm scale the feeling of a grand battle rather than a skirmish.
Another major fact in the choice of rules is that with Altar of freedom one 60x30mm base is a brigade, and at 6mm that equals 24 formed infantry to a base. That means no brigades made of up to 10 fiddly bases so theoretically a fast flowing game that can reach a satisfying conclusion in one evening rather than a draw forced by running out of time.
I placed my order with Peter at Baccus, including the swapping out of figures from an army pack. Customer service was excellent and cannot recommend Baccus highly enough! So now I have a large pile of lead to paint! Aim is to finish by the end of the summer, can it be done? AvP and Rise of the Kage kickstarters arriving over the summer may be a factor but i’m up for a challenge!